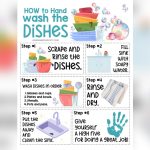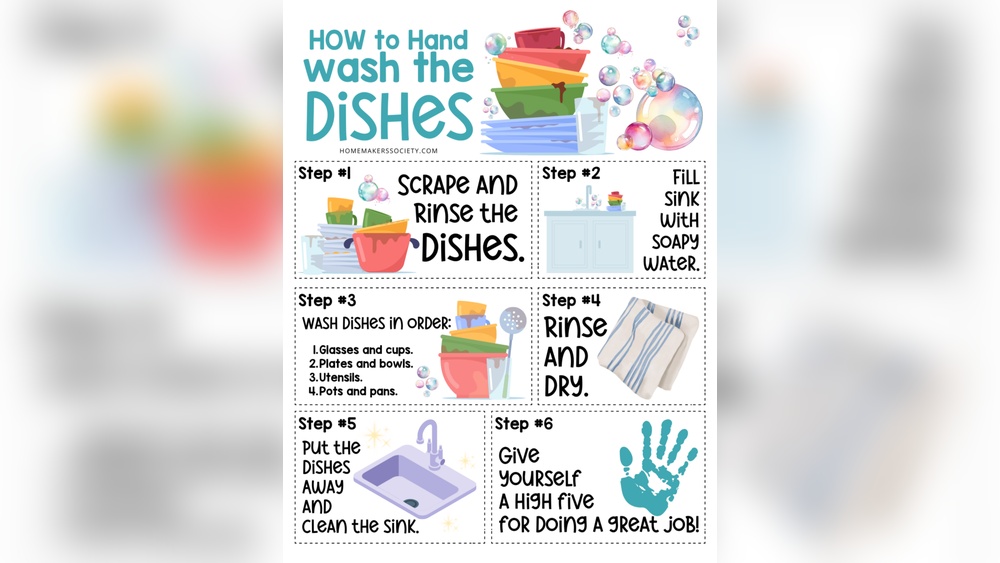

Doing the dishes might seem like a simple chore, but if you don’t do it the right way, it can take up more time and leave your kitchen less clean than you want. What if you could finish your dishes faster, without extra effort, and enjoy a spotless sink every time?
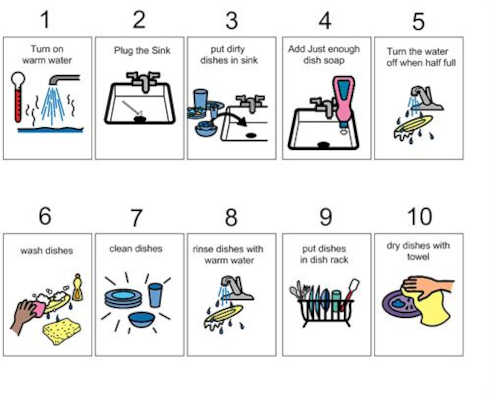
This guide will show you exactly how to do dishes step-by-step, making the whole process easier and even a little satisfying. Keep reading, and you’ll discover tips that save your time and energy—so you can get back to the things you really enjoy.

Credit: researchoutreach.org
Gathering Supplies
Before starting to wash dishes, gathering the right supplies is essential. Having the proper tools makes the task easier and more effective. It saves time and ensures dishes come out clean without damage. Focus on three main items: the sponge, dish soap, and protective gear like gloves and towels. Each plays a key role in cleaning dishes well and keeping your hands safe. Preparing these supplies first creates a smooth dishwashing process.
Choosing The Right Sponge
Selecting a good sponge is important for cleaning dishes efficiently. Sponges come in different materials and textures. The right sponge removes food and grease without scratching your dishes or hands.
Look for these types of sponges:
- Cellulose sponges: Soft, absorbent, and biodegradable. Great for everyday washing.
- Scrubbing sponges: Have a rough side for stuck-on food. Use gently on non-stick surfaces.
- Silicone sponges: Durable and easy to clean. Resist odors better than traditional sponges.
Match the sponge to your dish types:
| Dish Type | Recommended Sponge | Reason |
|---|---|---|
| Non-stick pans | Soft cellulose | Prevents scratches and damage |
| Regular plates and glasses | Scrubbing sponge | Effective on grease and food residue |
| Delicate glassware | Soft cellulose or microfiber cloth | Gentle cleaning without scratches |
Replace sponges regularly to avoid bacteria build-up. A fresh sponge works better and keeps your kitchen hygienic.
Selecting Dish Soap
Choosing dish soap affects cleaning power and skin safety. Some soaps remove grease fast but can dry your hands. Others are gentle but may need more effort to clean.
Check these features when picking dish soap:
- Grease-cutting ability: Helps remove oily residue quickly.
- Mild formula: Protects your skin from irritation.
- Eco-friendly ingredients: Better for the environment and safe for septic systems.
- Scent: Choose a fresh or neutral scent to avoid strong smells.
Here is a simple comparison of common dish soap types:
| Dish Soap Type | Cleaning Strength | Skin Friendliness | Eco Impact |
|---|---|---|---|
| Standard detergent | High | Low (can dry skin) | Moderate |
| Natural/plant-based | Moderate | High (gentle) | Low (biodegradable) |
| Hypoallergenic | Moderate | Very high (for sensitive skin) | Low |
Use dish soap sparingly. A small amount usually creates enough suds for cleaning. Overuse wastes product and water during rinsing.
Using Gloves And Towels
Protect your hands and keep your workspace dry by using gloves and towels. Gloves prevent skin dryness and irritation caused by hot water and soap. They also provide a better grip on slippery dishes.
Choose gloves made of:
- Latex: Flexible but can cause allergies.
- Nitrile: Durable and allergy-free.
- Rubber: Common, affordable, and effective.
Use clean towels for drying dishes and wiping spills. Microfiber towels work well because they absorb water quickly and leave no lint behind. Keep one towel for drying dishes and another for wiping counters.
Tips for using gloves and towels effectively:
- Wear gloves before starting the dishwashing to protect skin.
- Rinse gloves after use and hang to dry.
- Use separate towels to avoid spreading bacteria.
- Wash towels regularly to keep them clean.
Having gloves and towels ready makes dishwashing safer and more comfortable. It also helps keep your kitchen clean and tidy during the process.
Preparing The Sink
Preparing the sink is an essential step before starting to wash dishes. A clean and well-prepared sink helps make dishwashing easier and more efficient. Taking time to set up the sink properly ensures that your dishes get cleaned thoroughly without clogging or mess. This part focuses on three main tasks: clearing the drain, filling the sink with warm water, and adding soap. Each task plays a key role in creating the best washing environment.
Clearing The Drain
Before filling the sink, always clear the drain of any food scraps or debris. This prevents clogging and allows water to flow freely. Use these simple steps:
- Remove any visible food pieces from the drain area by hand or with a paper towel.
- Check the drain stopper or strainer for trapped food and clean it thoroughly.
- Run a small amount of hot water to flush out smaller particles.
Clearing the drain stops bad odors and keeps the sink working well. It also reduces the chance of bacteria growing in leftover food bits.
| Common Drain Blockers | How to Remove |
|---|---|
| Food scraps | Use a paper towel or gloves to pick out |
| Grease buildup | Pour hot water and use a mild detergent |
| Small debris | Flush with hot water or use a drain brush |
Remember: Never pour large food pieces or grease down the drain. This causes clogging and bad smells.
Filling With Warm Water
Filling the sink with warm water is important for effective cleaning. Warm water helps to loosen dirt and grease on dishes. Follow these tips for the best results:
- Use a comfortable water temperature — not too hot to touch, not too cold.
- Fill the sink halfway or enough to cover the dishes you plan to wash.
- Keep water at a steady temperature while washing to avoid cooling down.
Warm water also helps the soap work better and kills some bacteria on dishes. Cold water does not dissolve grease well, making cleaning harder.
| Water Temperature | Effect on Cleaning |
|---|---|
| Too Hot (above 120°F) | May burn hands and damage some dishware |
| Warm (100°F – 110°F) | Best for loosening grease and comfortable for hands |
| Cold (below 80°F) | Less effective at removing grease and dirt |
Tip: Use a thermometer if unsure about water temperature. Comfort and cleaning power both matter.
Adding Soap
Adding the right amount of dish soap is key for cleaning dishes well. Soap breaks down grease and removes food residue easily. Follow these steps to add soap correctly:
- Choose a good quality dish soap designed for hand washing.
- Pour a small amount (about a tablespoon) into the filled sink.
- Use your hand or a sponge to mix the soap with water until suds form.
Too much soap creates excess bubbles that make rinsing hard. Too little soap may not clean dishes properly.
| Soap Amount | Effect |
|---|---|
| Too Much | Hard to rinse, wastes soap, leaves residue |
| Just Right | Good suds, cleans well, easy to rinse |
| Too Little | Poor cleaning, grease and dirt remain |
Note: Some soaps are concentrated; read instructions on the label for best use.
Sorting Dishes
Sorting dishes properly is a key step in washing dishes quickly and well. It saves time and stops damage to your plates, glasses, and utensils. Organizing dishes before washing helps you clean them better and makes drying easier. A good sorting method sets the stage for an efficient dishwashing process. It also keeps your kitchen tidy and safe.
Separating By Material
Start by grouping dishes based on their material type. This helps protect fragile items and ensures each gets the right cleaning care. Different materials need different washing methods and water temperatures. For example, glassware is delicate and can break easily, so wash it separately from heavy pots.
Common dish materials to separate:
- Glass and crystal
- Plastic
- Ceramic and porcelain
- Metal (stainless steel, aluminum)
- Wood (cutting boards, utensils)
Separate items by type and material using a simple table like this:
| Material | Wash Tips | Drying Method |
|---|---|---|
| Glass | Use warm water, avoid harsh scrubbing | Air dry or soft towel |
| Plastic | Wash with mild soap, avoid high heat | Air dry to prevent warping |
| Ceramic/Porcelain | Use warm water, gentle sponge | Dry with towel to avoid water spots |
| Metal | Use warm water, dry quickly to prevent rust | Dry immediately with towel |
| Wood | Wash quickly, avoid soaking | Wipe dry, air dry standing up |
Keeping these groups separate stops damage and speeds up cleaning. It also helps you use the right tools and soap for each type. This way, your dishes stay clean and last longer.
Stacking For Efficiency
Stacking dishes properly saves space and makes washing faster. Arrange dishes so water and soap reach all surfaces easily. Avoid piling too many dishes on top of each other. This stops water from reaching the bottom items and prevents breakage.
Tips for smart stacking:
- Place plates upright in a rack or stand them on their edges.
- Stack bowls nested but not too tightly.
- Keep glasses upside down to avoid water pooling inside.
- Lay utensils flat or stand them in a holder with handles up.
Here is an example layout for stacking dishes efficiently:
| Dish Type | Stacking Method | Reason |
|---|---|---|
| Plates | Stand on edges, spaced apart | Easy to wash both sides |
| Bowls | Nested, not tight | Water reaches inside easily |
| Glasses | Upside down, spaced | Prevents water pooling |
| Utensils | Handles up in holder or flat | Safer and easier to grab |
Stacking dishes this way improves water flow and soap coverage. It also lowers the risk of chips and cracks. Keep your dishwashing efficient and safe by sorting and stacking carefully before washing.

Credit: researchoutreach.org
Washing Techniques
Washing dishes well keeps your kitchen clean and your dishes safe to use. Good washing techniques save time and make your dishes shine. Knowing how to scrub, handle tough stains, and clean glassware carefully helps keep your dishes in top shape. These tips work for all dish types and make washing easier.
Scrubbing Basics
Start by rinsing dishes to remove loose food. Use warm water to help break down grease and food bits. Choose a scrubber that fits the dish type. For example, use a sponge for plates and a brush for pots.
- Use dish soap: It cuts grease and cleans well.
- Scrub in circles: This removes food stuck on dishes better.
- Don’t scrub too hard: It can damage some dish surfaces.
Follow this simple order to save time:
- Wash glasses first.
- Then plates and bowls.
- End with pots and pans.
Keep your scrubbing tools clean. Change sponges or scrubbers often to avoid bacteria build-up. A clean scrubber means cleaner dishes.
Handling Stubborn Stains
Stubborn stains need extra care. Soak dishes in warm, soapy water for 10-15 minutes to loosen food. Use a scrubber or brush to remove residue. For tough stains, try these tricks:
| Stain Type | Cleaning Tip | Tool Needed |
|---|---|---|
| Burnt food | Soak with baking soda paste | Scrub brush or sponge |
| Grease | Use hot water and dish soap | Sponge or scrubber |
| Tea or coffee stains | Rub with lemon or vinegar | Soft cloth or sponge |
Use gentle scrubbing for delicate dishes. For plastic containers, avoid harsh scrubbing that causes scratches.
Cleaning Glassware Carefully
Glassware needs a gentle touch to avoid cracks and spots. Use warm water and mild soap. Avoid very hot water, which can cause glass to break.
- Wash by hand: Avoid dishwashers for delicate glasses.
- Use a soft sponge: Prevent scratches and cloudiness.
- Rinse well: Remove all soap to avoid spots.
Dry glasses with a clean, lint-free towel. Hold the glass by the bowl, not the stem, to avoid breaks. Store glasses upright to keep them clean and safe.
Rinsing Tips
Rinsing dishes is an important step in the dishwashing process. It removes leftover soap and food particles, leaving plates and utensils clean and ready to dry. Good rinsing helps prevent spots and film on dishes. It also makes sure no germs or dirt remain. Follow these rinsing tips to make your dishes shine and keep your kitchen hygienic.
Using Hot Water
Hot water is very effective in rinsing dishes. It helps melt grease and removes food stuck on plates and pots. The heat also kills many germs, making your dishes safer to use.
Here are some tips for using hot water well:
- Set water temperature between 110°F and 120°F. This is hot enough to clean but safe to handle.
- Run water for a few seconds before rinsing. This ensures the water is hot when it touches your dishes.
- Use a spray nozzle or a strong water stream. It helps wash away soap and food faster.
- Rinse each dish individually. This stops leftover soap from drying on the surface.
Below is a simple table showing benefits of rinsing with hot water:
| Benefit | Explanation |
|---|---|
| Grease Removal | Hot water melts oils and fats for easier cleaning. |
| Germ Reduction | Heat kills many bacteria and germs on dishes. |
| Soap Removal | Warm water rinses off soap quickly without leaving residue. |
Checking For Residue
After rinsing, always check dishes for any leftover residue. Soap, food bits, or grease can stick to plates and glasses. Residue can cause bad smells and attract germs if not removed.
Follow these steps to check for residue:
- Look closely under good light. Hold dishes at different angles to find spots or film.
- Feel the surface. A smooth surface means clean; sticky or rough means residue remains.
- Smell the dish. Soap or food smells mean it needs another rinse.
Use this quick checklist to spot residue:
- White or cloudy film on glassware
- Sticky or greasy touch on plates
- Food bits stuck in corners or grooves
- Soap bubbles or foam left on surface
Removing residue keeps dishes fresh and safe for eating. Rinse again if you find any residue. Use a clean cloth or sponge to scrub tough spots before rinsing once more.
Drying Methods
Drying dishes is a key step after washing to keep your kitchen clean and your dishes ready to use. Choosing the right drying method helps prevent water spots and bacteria growth. Two popular methods are air drying and towel drying. Each has benefits and small challenges. Knowing how to organize dishes after drying also keeps your kitchen tidy and saves time during your next meal. Below, find details on drying dishes and organizing them effectively.
Air Dry Vs Towel Dry
Air drying means leaving dishes on a rack or mat to dry naturally. This method uses no towels, so it reduces the risk of spreading germs. Air drying is easy and needs little effort. Just place your dishes in a dish rack with good airflow. It’s best for plates, glasses, and utensils that don’t hold water inside.
- Benefits of air drying:
- Reduces bacteria growth
- Prevents scratches on dishes
- Uses no extra towels, so less laundry
- Drawbacks:
- Can take longer to dry
- Water spots may form on some materials
- Needs space for drying rack
Towel drying uses a clean, dry towel to wipe dishes by hand. It speeds up drying and helps avoid water spots. Use soft, lint-free towels to protect delicate items. Towel drying works well for plastic containers, bowls, and pots that trap water. It also helps when you need dishes ready quickly.
- Benefits of towel drying:
- Quick drying process
- Prevents water spots
- Good for items that hold water inside
- Drawbacks:
- Needs clean towels to avoid germs
- Extra laundry to wash towels
- May scratch some surfaces if towel is rough
| Drying Method | Pros | Cons |
|---|---|---|
| Air Dry | Less bacteria, no scratches, no towels needed | Slow drying, water spots, needs space |
| Towel Dry | Fast drying, no spots, good for trapped water | Needs clean towels, laundry, possible scratches |
Organizing Dried Dishes
After drying, organizing dishes saves space and keeps your kitchen neat. Start by grouping similar items together. Stack plates by size, nest bowls, and place cups upside down. Use shelves or cabinets with enough space to avoid clutter.
Follow these tips for better organization:
- Use vertical space: Install racks or shelves to hold more dishes.
- Keep daily use items accessible: Store plates and cups you use often in easy-to-reach places.
- Separate clean and dirty dishes: Have different spots for each to avoid mix-ups.
- Use organizers: Drawer dividers or shelf racks help keep small items like utensils tidy.
Consider this simple layout for cabinets:
| Cabinet Section | Items Stored | Tips |
|---|---|---|
| Top Shelf | Rarely used dishes and special items | Keep out of reach but easy to find |
| Middle Shelf | Everyday plates, bowls, and cups | Store by frequency of use |
| Lower Shelf or Drawer | Pots, pans, and utensils | Use organizers for utensils |
Organizing dried dishes makes your kitchen efficient. It helps you find what you need fast and keeps your space clean. This simple system fits most kitchens and keeps your dishes safe from damage.
Maintaining Dishwashing Tools
Keeping your dishwashing tools clean and well-maintained is essential for effective dishwashing. Dirty or worn-out tools can spread germs and make cleaning harder. Proper care extends the life of sponges, brushes, and cloths. It also ensures your dishes come out spotless every time. Simple habits help keep your dishwashing supplies fresh and ready for use.
Cleaning Sponges
Sponges are great for scrubbing but can hold bacteria if not cleaned properly. To keep sponges safe and fresh, clean them daily. Here are easy ways to clean sponges:
- Microwave Method: Wet the sponge and microwave it for 1-2 minutes. This kills most germs. Be careful when removing it as it will be hot.
- Dishwasher Method: Place the sponge in the dishwasher on the top rack. Use a hot water cycle and let it dry completely.
- Soaking Method: Soak the sponge in a mixture of one part bleach to nine parts water for 5 minutes. Rinse well after soaking.
Replace sponges often, especially if they start to smell or break apart. A good rule is to change them every 1-2 weeks. Using a clean sponge helps prevent germs from spreading to your dishes and sink area.
| Cleaning Method | Time Needed | Effectiveness | Notes |
|---|---|---|---|
| Microwave | 1-2 minutes | High | Must be wet; handle carefully |
| Dishwasher | Full cycle | Moderate to High | Let dry fully |
| Bleach Soak | 5 minutes | High | Rinse well after soaking |
Storing Supplies Properly
Storing dishwashing tools correctly keeps them dry and clean. Damp tools can grow bacteria and smell bad. Follow these tips to store supplies well:
- Keep sponges and brushes in a holder with good drainage. This helps water drip away and speeds drying.
- Hang dishcloths to dry instead of leaving them in the sink or on the counter. Use hooks or a rack.
- Store soap and detergents in a dry place away from water splashes to keep them effective.
- Use separate holders for different tools to avoid cross-contamination.
Check your storage area regularly. Clean it if you see mold or buildup. A clean storage spot helps tools last longer and stay fresh.
| Tool | Storage Tip | Why |
|---|---|---|
| Sponges | Holder with drainage | Prevents mold and bacteria |
| Dish Brushes | Hang to dry | Keeps bristles dry and clean |
| Dishcloths | Hang on hooks or rack | Stops bad smells and bacteria |
| Soap & Detergent | Dry shelf, away from water | Maintains product quality |
Credit: www.myboardmaker.com
Frequently Asked Questions
How Do I Wash Dishes Effectively By Hand?
Start by scraping off food debris. Use warm, soapy water and a sponge. Wash items from cleanest to dirtiest. Rinse with hot water. Dry with a clean towel or air dry for best results.
What Is The Best Order For Washing Dishes?
Wash glasses and cups first, then utensils. Next, clean plates and bowls. Finally, tackle pots and pans. This prevents greasy residue from spreading and keeps your water cleaner longer.
How Can I Remove Tough Food Stuck On Dishes?
Soak dishes in warm, soapy water for 10-15 minutes. Use a scrub brush or sponge to loosen debris. For stubborn spots, sprinkle baking soda and scrub gently.
Is It Better To Use Hot Or Cold Water For Dishes?
Use hot water as it dissolves grease and kills bacteria better. Cold water is less effective for cleaning and drying dishes thoroughly.
Conclusion
Doing dishes gets easier with clear steps and simple habits. Wash dishes soon after meals to stop food from sticking. Use warm water and soap to clean well. Rinse thoroughly to remove all soap. Dry dishes or let them air dry for best results.
Keep your sink and sponge clean to avoid germs. With practice, washing dishes becomes quick and less tiring. A clean kitchen feels fresh and inviting. Small daily efforts make a big difference in cleanliness. Try these tips, and enjoy a tidy kitchen every day.