
Tying a tie might seem tricky at first, but once you learn the simple steps, it becomes second nature. Whether you’re getting ready for an important meeting, a special event, or just want to look sharp every day, knowing how to tie a tie gives you confidence and style.
This guide will show you easy, clear methods to master the perfect knot quickly. By the end, you’ll be able to dress with ease and impress without any stress. Ready to upgrade your look? Let’s get started!
Credit: www.ties.com
Choosing The Right Tie
Choosing the right tie is key to looking sharp and feeling confident. A good tie matches your outfit and fits the occasion. It also suits your body type and personal style. Picking the right fabric, pattern, length, and width makes all the difference. Here’s how to find the best tie for you.
Fabric And Pattern Tips
Choose fabric based on the season and event. Silk ties work well for formal events and all seasons. Wool or knit ties suit cooler weather and casual looks. Cotton ties fit summer and relaxed settings.
Patterns add personality. Solid colors are safe and versatile. Stripes and dots bring subtle style. Bold patterns stand out but need simple shirts. Match tie patterns with your shirt’s design. Avoid clashing prints for a neat look.
Tie Length And Width
The tie length should reach your belt buckle. Too short or too long looks sloppy. Most ties are about 57 to 60 inches long. Taller men may need longer ties.
Width depends on your body and jacket style. Slim ties suit slim builds and narrow lapels. Wider ties look better on larger frames and wide lapels. Standard width is around 3 to 3.5 inches. Balance your tie width with your suit for a clean look.
Preparing Your Collar
Preparing your collar is the first step in tying a perfect tie. A neat collar sets the base for a smooth knot and sharp look. It helps the tie sit well and feel comfortable all day. Take time to arrange your collar before starting the knot.
Collar Types To Consider
Different collar types affect how your tie looks. Point collars are narrow and classic. They suit most tie knots and styles. Spread collars have wider space between points. They work well with larger knots like the Windsor. Button-down collars keep points fastened to the shirt. They create a casual, neat look with simple knots. Choose your collar type to match the occasion and tie style.
Adjusting The Collar For Comfort
Comfort matters for all-day wear. Adjust your collar to avoid tightness or gaps. Fasten the top button of your shirt. Check the collar fits well around your neck. You should fit one finger between collar and skin. If it feels too tight, loosen the collar or wear a different size. A comfortable collar helps your tie knot hold its shape better.
Basic Tie Knots
Tying a tie is a useful skill for many occasions. Basic tie knots offer simple ways to look neat and stylish. Each knot fits different collar types and events. Learning a few knots helps you dress well every day.
Four-in-hand Knot
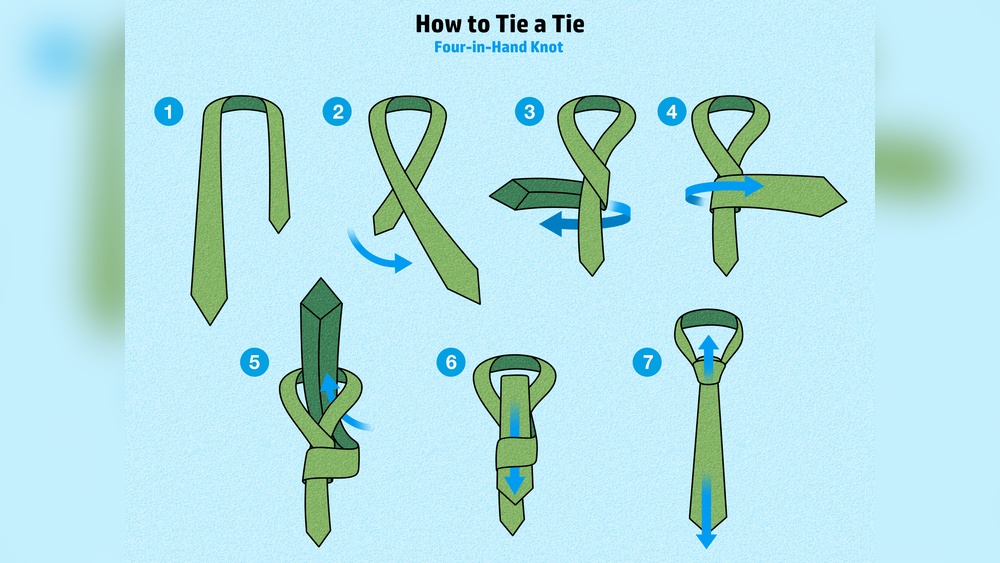
The Four-in-Hand knot is easy and quick to tie. It creates a narrow, slightly angled knot. This knot suits most collars and casual or formal wear. It works well with thinner ties and shorter necks. Perfect for beginners and daily use.
Half Windsor Knot
The Half Windsor knot is medium-sized and symmetrical. It looks neat and balanced on most shirts. This knot suits wider collar spreads and formal settings. It takes a little more time than the Four-in-Hand. A good choice for business or special occasions.
Full Windsor Knot
The Full Windsor knot is large and triangular. It gives a strong, confident look. This knot fits wide collar spreads and thick ties. It works best for formal events and important meetings. It needs more steps but creates a bold statement.
:max_bytes(150000):strip_icc()/HowtoTieaTie-cdd03f6e45204acfabdc35538daa068d.png)
Credit: www.realsimple.com
Step-by-step Knot Instructions
Tying a tie is easier than it looks. Follow clear steps to get a neat knot every time. This guide walks you through each part of the process. Focus on the details and practice to improve your skill.
Positioning The Tie
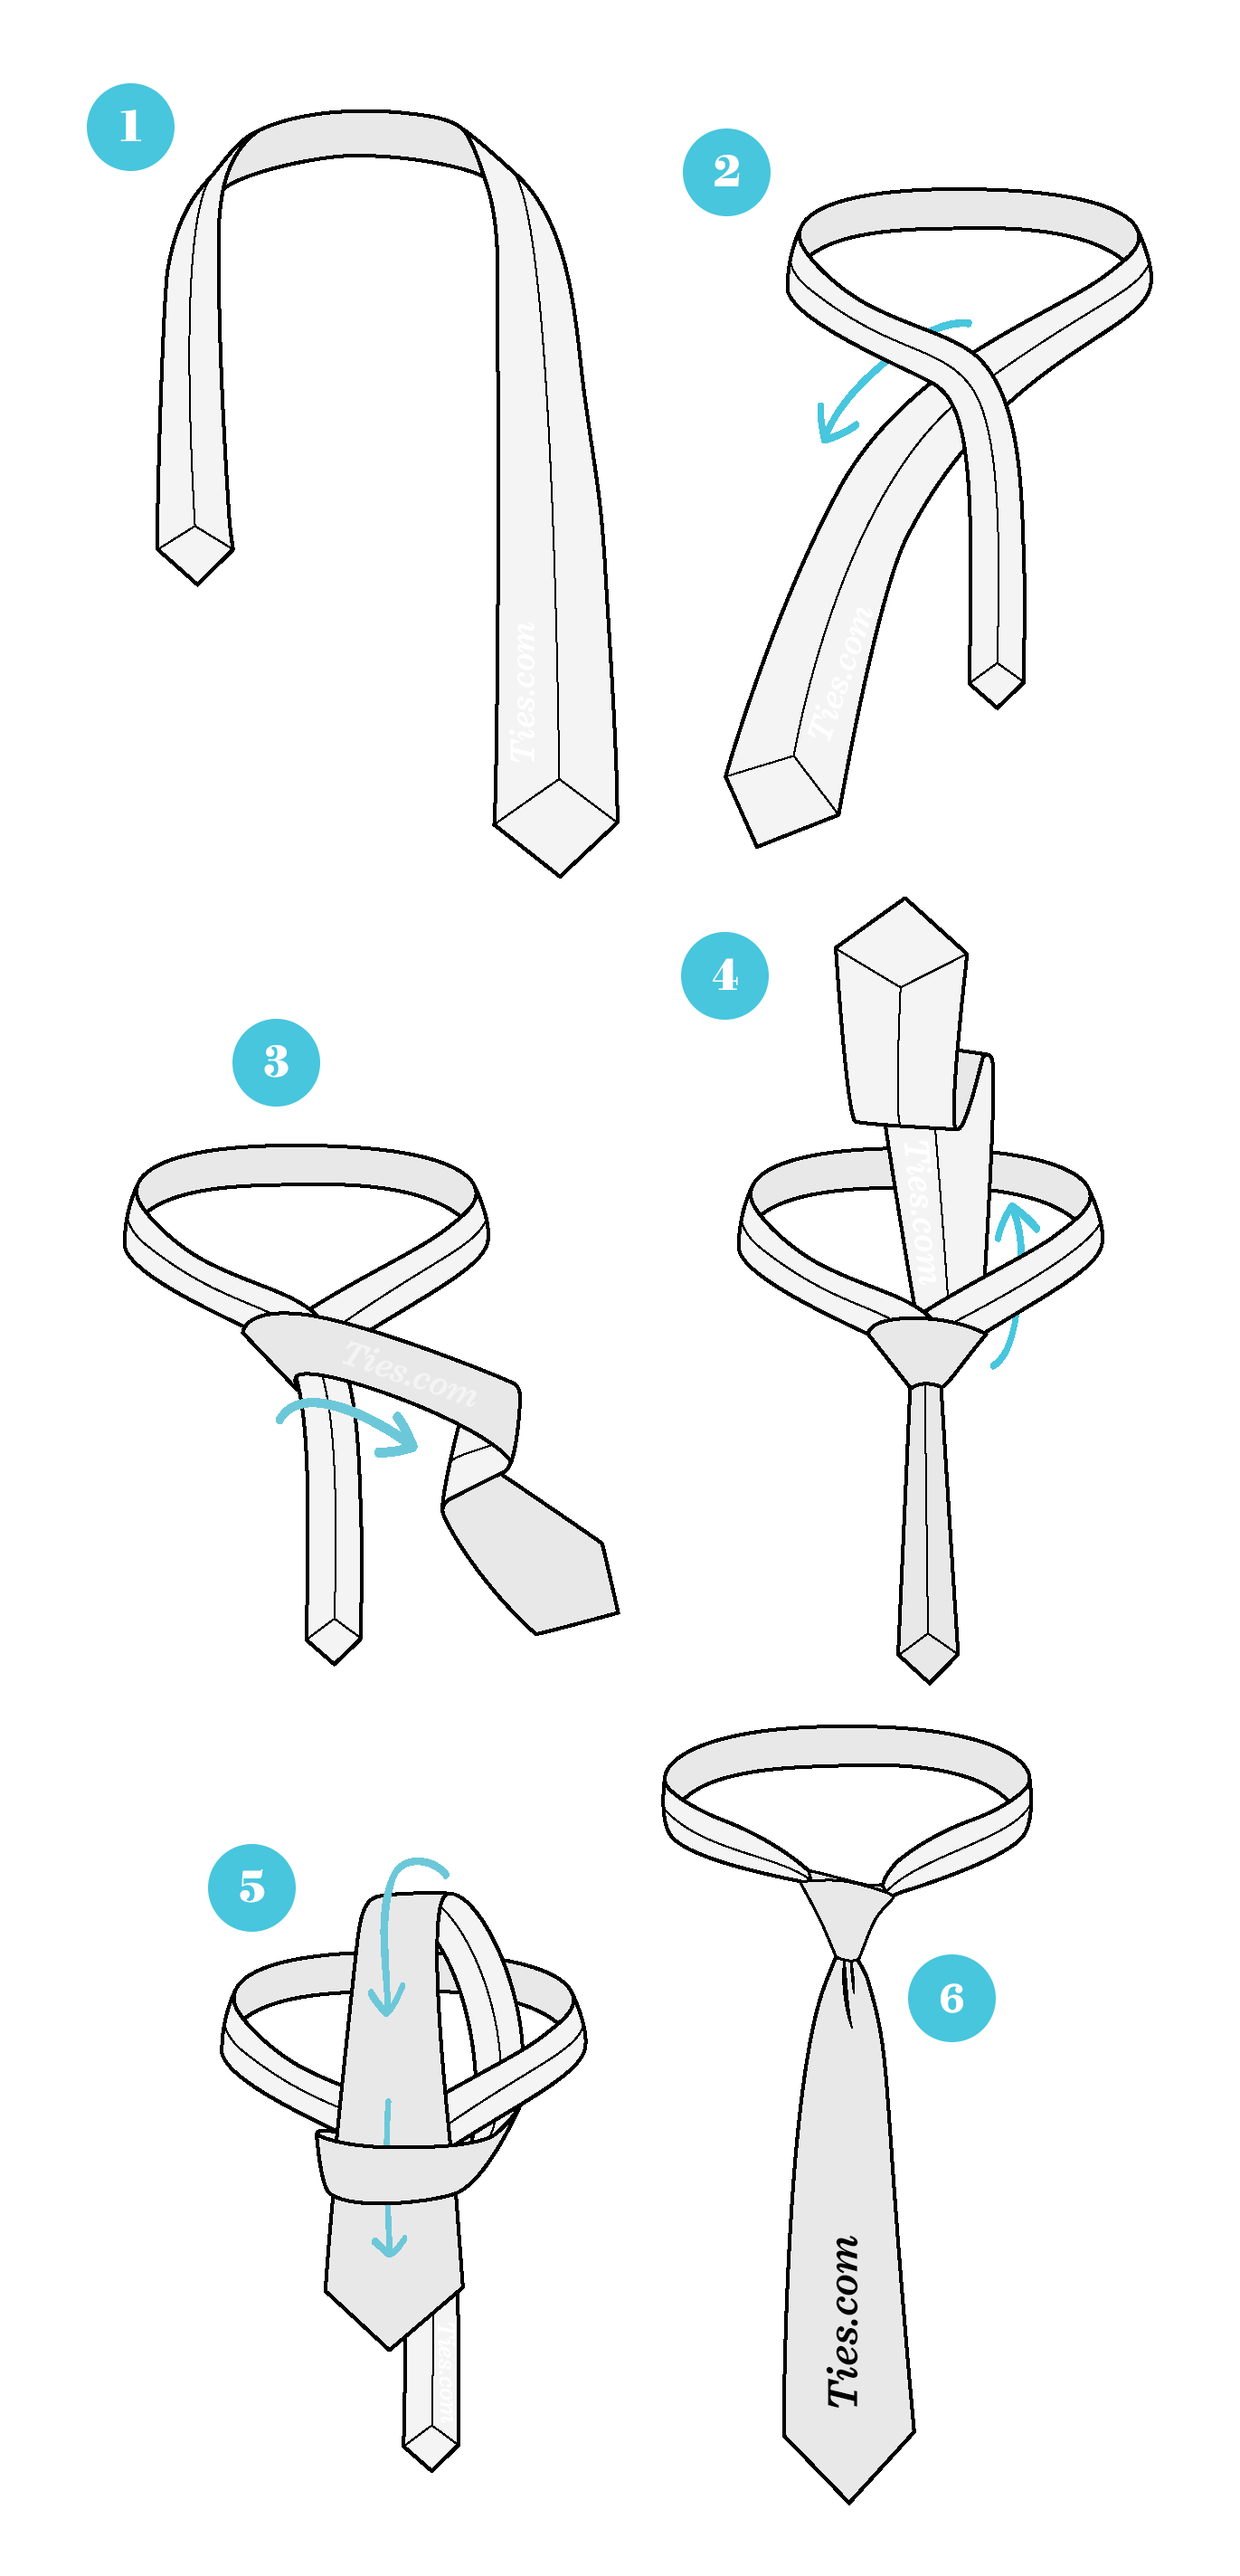
Start with the wide end of the tie on your right side. The narrow end should rest on your left. Adjust the length so the wide end hangs lower. This length depends on your height and tie size. Keep the tie flat against your shirt.
Looping And Crossing Techniques
Cross the wide end over the narrow end. Bring the wide end under the narrow part. Loop it over again, creating a simple knot shape. Hold the knot loosely with one hand. Use the other hand to guide the wide end through the loop.
Tightening And Adjusting
Pull the wide end down to tighten the knot. Slide the knot up toward your collar. Keep the knot centered and neat. Adjust the tie to remove wrinkles or twists. Check the length; the tip should reach your belt.
Tips For A Perfect Knot
Tying a perfect knot takes practice and attention to detail. Small steps make a big difference. Follow these tips to achieve a neat and balanced tie knot every time.
Maintaining Symmetry
Start by centering the tie under your collar. Keep the knot tight but not too tight. Adjust the loops evenly on both sides. A symmetrical knot looks sharp and clean. Check your knot in the mirror before finalizing.
Avoiding Common Mistakes
Don’t let the tie twist while tying. Avoid pulling the narrow end too hard. Make sure the wide end covers the narrow end fully. Avoid knots that are too big or too small for your collar. Practice slowly to build muscle memory.
Securing The Tie In Place
Use the tie’s keeper loop on the back to hold the narrow end. Tuck the narrow end behind the wide end carefully. Ensure the knot feels snug but comfortable around your neck. Adjust the collar to hide any gaps. A secure tie stays neat all day long.

Credit: www.wikihow.com
Caring For Your Tie
Caring for your tie keeps it looking sharp and lasting longer. Proper care stops wrinkles, stains, and damage. It also helps maintain the fabric’s color and shape. Simple habits make a big difference in tie care.
Proper Storage Methods
Store ties by hanging them on a tie rack or hanger. This prevents wrinkles and creases. Rolling ties gently and placing them in a drawer works too. Avoid tight knots or folding ties sharply. Keep ties away from direct sunlight to stop fading.
Cleaning And Maintenance
Spot clean stains quickly with a damp cloth. Use mild soap for tough spots but test on a small area first. Dry clean ties only when necessary to avoid fabric damage. Avoid washing ties in a machine or soaking them. Let ties air dry naturally after cleaning. Iron gently on low heat or use a steamer to remove wrinkles.
Frequently Asked Questions
How Do I Tie A Basic Necktie Knot?
To tie a basic necktie knot, start with the wide end longer. Cross it over the narrow end, loop under, then through the neck loop, and tighten. This forms a simple and classic knot suitable for most occasions and easy to master.
What Is The Easiest Knot For Beginners To Learn?
The Four-in-Hand knot is the easiest for beginners. It is simple, quick, and creates a narrow, asymmetrical knot. Ideal for casual or professional settings, it works well with most tie fabrics and collar types, making it perfect for those new to tying ties.
How Long Should A Properly Tied Tie Be?
A properly tied tie should end near your belt buckle. The tip of the tie should lightly touch or slightly cover the belt line. This length ensures a balanced and polished look suitable for formal or business attire.
Can I Tie A Tie Without A Mirror?
Yes, you can tie a tie without a mirror by memorizing the steps. Practice the knot repeatedly to develop muscle memory. Using tactile feedback and following a consistent sequence helps you tie a neat knot confidently, even without visual assistance.
Conclusion
Tying a tie can seem hard at first. Practice each step slowly and clearly. Soon, tying a neat knot will feel easy. A well-tied tie adds style and confidence. Remember, different knots suit different occasions. Try a few to find your favorite.
Keep a mirror nearby to check your work. With patience, this skill will become natural. Wear your tie proudly and enjoy the look. Small efforts make a big difference in appearance. Keep practicing, and you will improve every day.