Have you ever stood in front of a mirror, struggling to tie your tie just right? You’re not alone.
Knowing how to tie a tie is more than just a skill—it’s a confidence booster. Imagine walking into any room, knowing your tie looks perfect. You’ll discover simple, step-by-step instructions that make tying a tie easy and stress-free. Whether it’s for a job interview, a wedding, or just a day at the office, you’ll learn how to master this essential skill quickly.
Keep reading, and soon tying your tie will feel natural and effortless.
:max_bytes(150000):strip_icc()/HowtoTieaTie-cdd03f6e45204acfabdc35538daa068d.png)
Credit: www.realsimple.com
Choosing The Right Tie
Choosing the right tie is the first step to looking sharp. A good tie suits the occasion and your style. It can change how you look and feel. Knowing how to pick the perfect tie saves time and stress. This guide helps you make smart choices.
Fabric And Pattern Tips
Pick a fabric that fits the event. Silk ties look great for formal events. Cotton or wool ties work well for casual days. Patterns add personality to your outfit. Stripes and dots are classic choices. Keep the pattern size balanced with your shirt. Small patterns suit plain shirts. Large patterns match simple suits.
Matching With Your Outfit
Match your tie color with your shirt and suit. Dark suits pair well with bright ties. Light suits look good with soft-colored ties. Avoid matching your tie exactly to your shirt. Contrast helps the tie stand out. Use colors that complement each other. Check the color wheel for safe choices. This makes your outfit look planned and neat.
Preparing Your Tie
Start by choosing a clean, wrinkle-free tie. Lay it flat and adjust the length to match your height. Make sure the wide end is longer than the narrow end before tying.
Adjusting Tie Length
Preparing your tie starts with getting the length right. The wider end of the tie should be longer than the narrow end. Hold the tie around your neck, with the wide end on your dominant side. Adjust the length so the tip of the wide end reaches your belt buckle. This length works best for most tie knots. If the tie is too short or too long, adjust it until it feels comfortable.
Positioning The Tie Correctly
Next, position the tie properly around your neck. The narrow end stays close to your chest. The wide end crosses over the narrow end. Make sure the tie lies flat against your shirt collar. Avoid any twists or folds. A smooth start helps create a neat knot later. Check the mirror to confirm the tie sits evenly on both sides.
Simple Knot Styles
Tying a tie can seem hard at first. Simple knot styles make it easier. They work well for many occasions. Learning these knots helps you dress sharp fast.
Simple knots look good with most shirts and collars. They do not take long to tie. You can use them daily or for special events. These knots create a neat and clean look.
Four-in-hand Knot
The Four-in-Hand is the easiest knot. It is slightly narrow and long. This knot suits casual and formal wear. It works best with thinner ties. To tie, wrap the wide end around the narrow end. Pull it through the loop and tighten gently.
Half Windsor Knot
The Half Windsor knot is medium in size. It looks symmetrical and balanced. This knot fits most collar types. It is more formal than the Four-in-Hand. To tie, wrap the wide end over and behind the narrow end. Bring it through the loop, then across the front. Pull it through the loop again and tighten.
Full Windsor Knot
The Full Windsor is large and wide. It creates a strong triangular shape. This knot suits wide spread collars best. It gives a very polished look. To tie, start with the wide end over the narrow end. Bring it up through the loop. Then wrap it around twice. Pull it through the loop and tighten firmly.

Credit: www.wikihow.com
Step-by-step Knot Tying
Tying a tie can seem tricky at first. Step-by-step knot tying breaks it into simple moves. Follow these clear steps to get a neat knot every time.
Creating The Base Loop
Start by placing the tie around your neck. The wide end should hang longer than the narrow end. Cross the wide end over the narrow end. This forms the base loop of your knot.
Forming The Knot Shape
Bring the wide end under the narrow end. Then, pull it up through the loop near your collar. Pass the wide end down through the front loop you just made. This shapes the knot.
Tightening And Adjusting
Hold the narrow end and slide the knot up. Tighten it gently toward your collar. Adjust the knot to sit flat and centered. Make sure the tie’s tip reaches your belt line.
Common Mistakes To Avoid
Tying a tie seems simple but many make the same errors. Avoiding these common mistakes helps you look sharp and confident. A neat tie can improve your whole outfit and impression.
Uneven Lengths
One side of the tie should not be longer than the other. Uneven lengths look sloppy and unbalanced. The narrow end should sit behind the wide end. Aim for the tip of the wide end to reach your belt buckle.
Loose Knots
A loose knot looks messy and can come undone easily. Pull the tie snug to create a tight knot. A firm knot holds its shape all day. Tight knots also help the tie sit correctly on your collar.
Wrong Knot For Collar
Different collars suit different knots. Wide collars match larger knots like the Windsor. Narrow collars look better with smaller knots like the Four-in-Hand. The right knot complements your shirt and face shape.
Tips For Lasting Wear
Wearing a tie that stays neat all day shows care and style. It feels good to know the knot will not slip or loosen. Small efforts keep your tie looking sharp and lasting longer. Follow these tips to keep your tie in place and maintain its condition.
Keeping The Knot Secure
Start by tightening the knot carefully. Pull the narrow end while holding the knot. Stop once the knot feels firm but not too tight. Avoid tugging too hard to prevent wrinkles. Check the knot after sitting or moving. Adjust it gently if it loosens during the day.
Maintaining Tie Condition
Untie your tie after use. Leaving it knotted can damage the fabric. Hang the tie on a rack or roll it loosely. Avoid folding it sharply to prevent creases. Clean stains quickly with a damp cloth. Dry clean only when necessary to keep the fabric fresh.
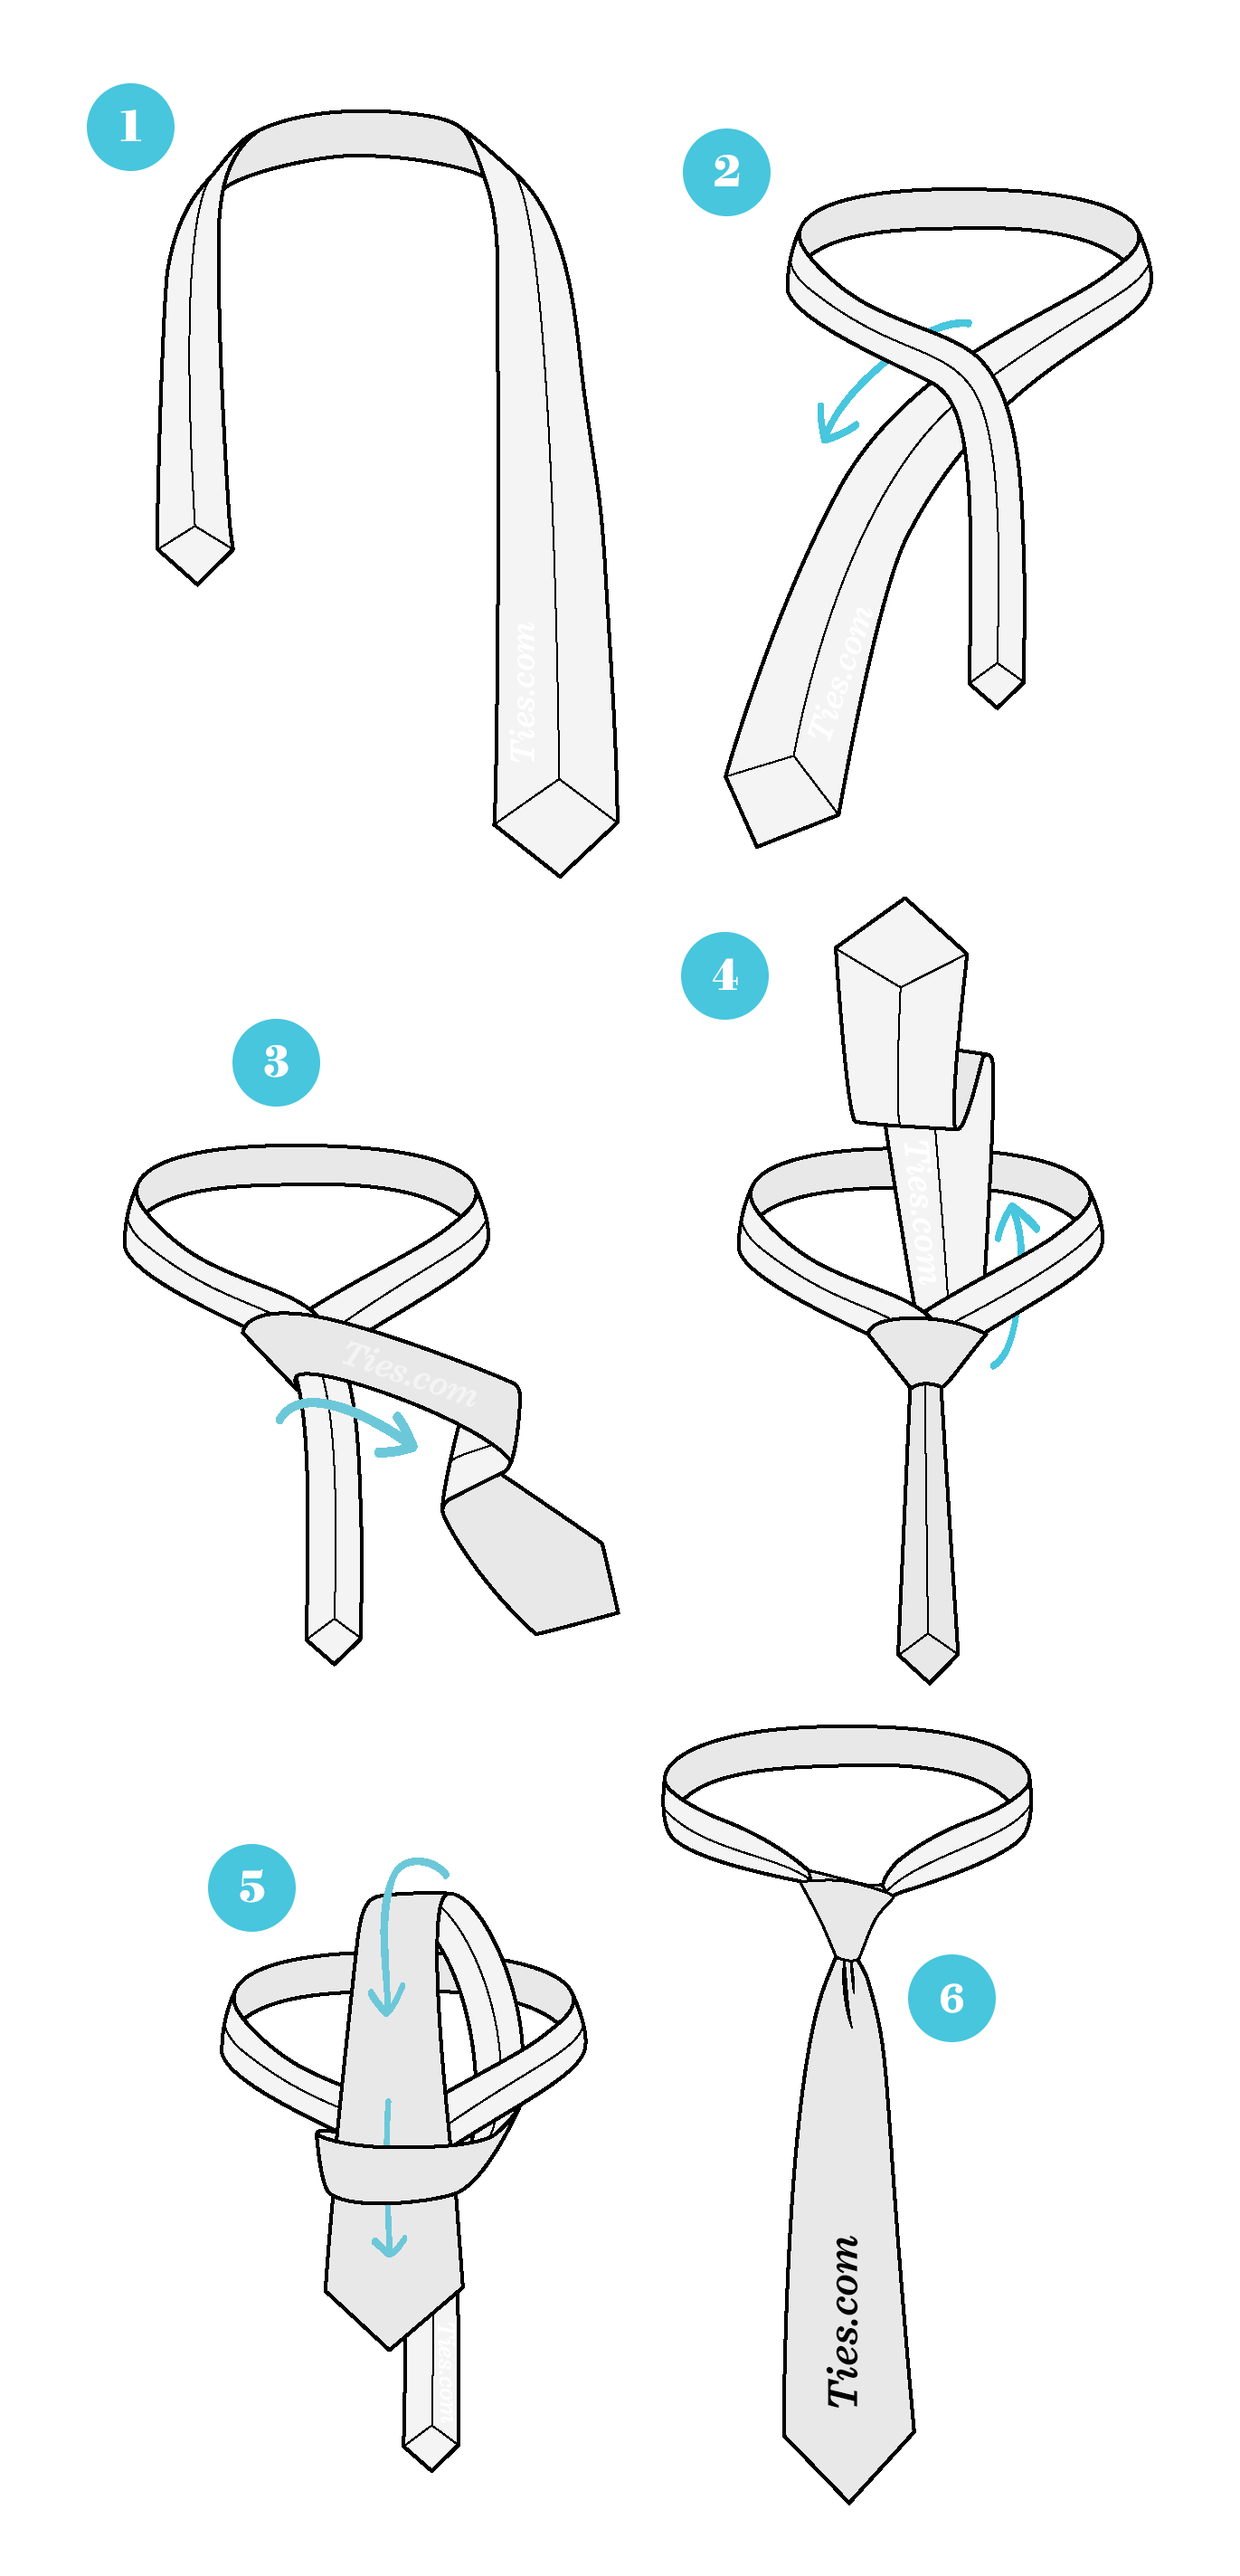
Credit: www.ties.com
Frequently Asked Questions
How Do I Tie A Basic Necktie Knot?
To tie a basic necktie knot, start with the wide end on your right. Cross it over the narrow end, loop it under, then pull through the front. Tighten the knot by sliding it up to your collar. This creates a classic, simple knot.
What Is The Easiest Tie Knot For Beginners?
The Four-in-Hand knot is the easiest for beginners. It’s simple and quick to tie. It works well with most collar types and tie fabrics. This knot is slightly asymmetrical and perfect for casual or formal occasions.
How Long Should A Tied Tie Be?
A properly tied tie should reach your belt buckle. It should neither be too short nor drag below the belt. This length ensures a neat, balanced look suitable for professional and formal settings.
Can I Tie A Tie Without A Mirror?
Yes, you can tie a tie without a mirror by practicing the steps repeatedly. Use your fingers to feel the knot’s shape and adjust tightness. Over time, muscle memory will help you tie it confidently without visual aid.
Conclusion
Tying a tie is a useful skill anyone can learn. Practice a few times to get comfortable with the steps. Choose the knot that fits your style and occasion. A neat tie adds confidence and sharpness to your look. Keep your tie clean and wrinkle-free for the best effect.
Soon, tying a tie will feel quick and easy. Try it today and see how it changes your outfit. Simple steps lead to a polished and smart appearance.